

Four must-have insta360 x5 accessories that will change how you shoot this summer
Four must-have insta360 x5 accessories that will change how you shoot this summer
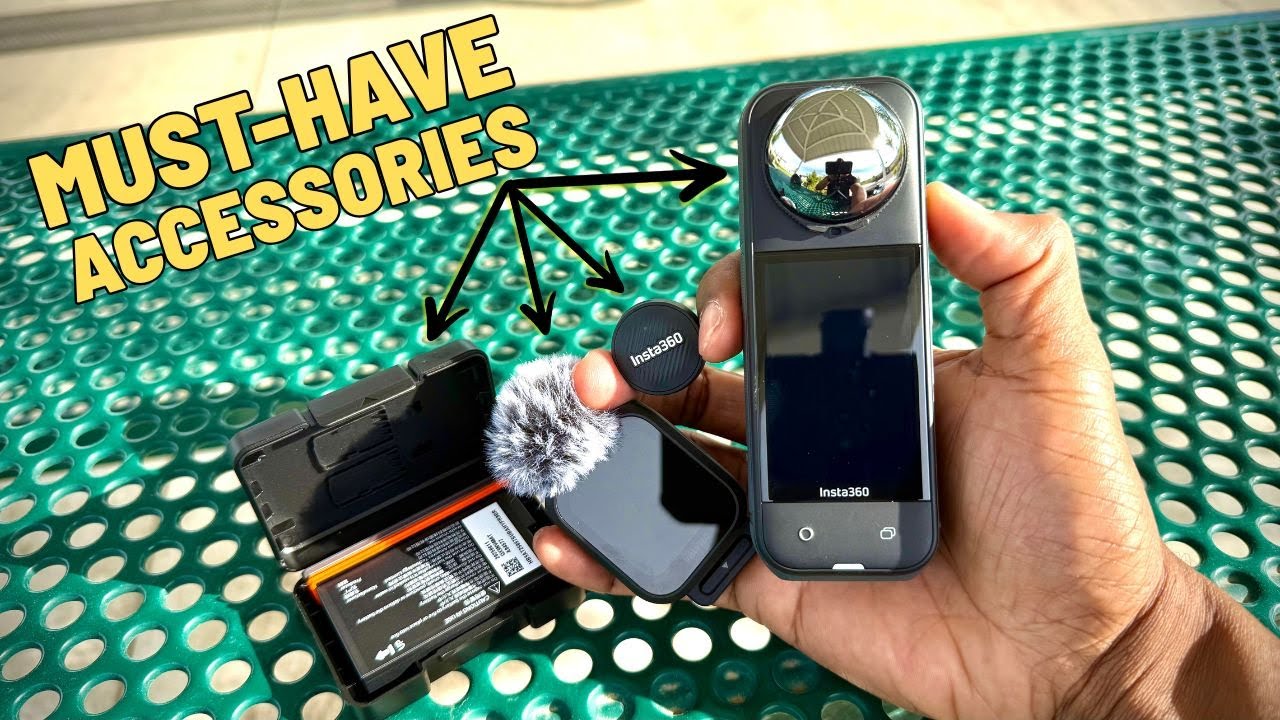
Summer is full-on, and my insta360 x5 accessories kit has become the core of how I capture hikes, bike rides, overland trips, and weekend adventures. Over the last few weeks I tested four new additions that instantly upleveled my footage and workflow. These are practical pieces of kit — not gimmicks — and each one solves a real problem I run into when shooting outdoors. Below I break down what I used, how I used it, and the exact settings and mounting tips that made a difference.
Why these insta360 x5 accessories matter
With a 360 camera like the X5, you already get incredible flexibility in framing and perspective. But real-world shooting also exposes three persistent pain points: monitoring and controlling the camera when it is mounted far away, getting natural-looking motion blur on bright days, extending battery life for longer trips, and capturing clean audio while on the move. These new insta360 x5 accessories tackle those problems head-on.
1) GPS Preview Remote with built-in mic: control, preview, and capture audio
The GPS Preview Remote is one of those items that combines a few different features into a single compact tool. It is a remote, yes, but it also has a full-color preview screen, built-in microphone (with windmuff), and GPS tracking. For anyone who mounts the X5 on a bike tail mount, on the back of a vehicle, or in awkward positions, this remote is a game changer.
What I appreciate most about this remote is how it solves multiple problems at once. When the X5 is mounted far behind or away from you, turning it on, picking a single-lens framing, and getting good audio all become logistical headaches. With the remote clipped to a backpack strap or worn on the wrist (it ships with both a clip and a strap), I can:
- Preview and frame single-lens modes directly on the remote screen
- Start and stop recording without walking back to the camera
- Capture decent on-location audio using the built-in mic and windmuff
- Record GPS telemetry that can be overlaid in post
The remote syncs with the X5 and exposes a surprisingly complete menu system, so you can check battery, change modes, adjust settings, and even use the touch preview to pan your view mid-shot. Range is quoted around 10 meters (about 20 feet) for full functionality and preview, which is plenty for helmet, bar, or backpack mounting. I used it clipped to my backpack strap while riding and found the mic position to be great for clean dialogue and ambient audio.
It is the perfect accessory if you're doing bike riding.
Practical examples: I mounted the X5 on the outside of my Jeep and controlled the camera from inside the vehicle. I was able to record and capture solid audio without needing extra running cables or to physically access the camera. I also used it on hikes where the camera sat on a distant stand and the remote let me control framing and capture audio with zero fuss.
2) X5 ND Filters: the first neutral density solution made for 360 cameras
ND filters are one of those understated breakthroughs for getting cinematic-looking video, and finally there is a purpose-built ND kit for the X5. These are the first ND filters designed for a 360 camera lens configuration, and they make a visible difference.
The primary reason to use an ND filter is to control shutter speed for proper motion blur. The rule of thumb I run by is simple: shutter speed should be roughly twice your frame rate for natural motion blur. For example, shooting 30 frames per second means aiming for a shutter speed around 1/60. On a bright day, that 1/60 will blow out your exposure unless you drop the ISO or use a neutral density filter.
In practice I used these settings:
- Resolution: 8K
- Frame rate: 30 fps
- Shutter speed: 1/60
- Filter: ND64 on bright, sunny days
Without an ND, shots of fast-rotating objects like a bike tire or fast-moving ground will look unnaturally sharp with visible detail that feels strobing rather than motion-filled. With the ND64 clipped on the X5 the camera detected the filter and you simply confirm which filter you installed. The difference is immediate: the tire and ground get the motion blur they need to look natural, which also enhances perceived speed and feels cinematic.
Available strengths include ND16, ND32, and ND64. On low-light or overcast days drop to ND16 or ND32 accordingly. The filters snap onto the lenses, are built to resist scratches and wear, and ship in a good protective case. For daytime bike and vehicle work I reached for the ND64 almost every time.
3) X5 Ultra Battery: more runtime and faster charging
Battery life is always the tradeoff with high-resolution 360 shooting. The standard X5 battery is 2400 mAh, which is decent, but for long outings I wanted more. The X5 Ultra Battery bumps capacity to 2800 mAh — roughly an 18 percent increase — and adds fast charging support.
- Capacity: 2800 mAh vs stock 2400 mAh
- Fast charge: about 80% in 20 minutes
- Endurance mode + Ultra Battery runtime: around 109 minutes (actual time depends on resolution and settings)
The Ultra battery ships with a tidy case that holds the battery plus space for a couple of microSD cards. It also has a different color band so you can tell it apart from the standard battery at a glance. Be mindful that shooting 8K or enabling certain power-hungry modes will still drain the battery faster, but with the Ultra battery and endurance mode I regularly extended my recording sessions enough to finish hikes or long drives without swapping batteries multiple times.
4) Mic Air: small Bluetooth mic built for easy vlogging
Good audio is half the experience of a good video. If you need a smaller, simpler audio solution compared to the GPS remote mic, the Mic Air is a compact Bluetooth transmitter that pairs instantly to Insta360 gear and other devices using the included USB-C transmitter.
What I liked about the Mic Air:
- Very small and light — great for day-to-day vlogging
- Magnetic attachment with a metal plate for discreet mounting
- Windmuff included for windy days and biking
- Bluetooth pairing designed for Insta360 devices, but the USB-C transmitter lets you use it with compatible phones and computers
I tested it over several weeks in varied scenarios: talking while hiking, helmet-mounted riding, and casual indoor clips. The Mic Air produced clear, usable audio and its small size makes it a natural accessory to toss into a pocket. For longer runs where I also wanted telemetry and on-remote preview, the GPS Preview Remote still wins, but for everyday vlogging the Mic Air is my go-to.
Supporting mount: Bike tail mount and practical setup tips
One accessory I used throughout testing was a bike tail mount. Mounted behind the seat it yields compelling perspectives where the camera sits well back from the subject. When you pair that mount with the GPS Preview Remote you avoid the common headaches:
- No running back to the bike to start/stop recording
- Single-lens framing adjustments via the remote preview
- Cleaner location audio without wires when using the remote mic or Mic Air
Tip: If you are capturing fast-moving sequences from a tail mount, use the ND64 and set shutter to 1/60 at 30 fps. That combo gives an immediate boost to cinematic feel and motion blur. Also, position the built-in mic (or attach the remote mic) where it is shielded a little by your body or pack to reduce wind noise. The windmuffs for both the Mic Air and the remote mic are small but effective when bicycling or in gusty conditions.
How I integrated these insta360 x5 accessories into my workflow
After a few outings with the new gear I refined a straightforward workflow that kept things simple and repeatable.
- Decide my primary capture mode: 8K30 for premium resolution, or a lower mode if I need extended battery life.
- If shooting in bright daylight, mount the ND filter (ND64) and set shutter to 1/60 for 30 fps. Confirm the filter in the X5 menu when prompted.
- Install the Ultra Battery for long days, or carry one extra standard battery for quick swaps. The Ultra battery is color-coded so mistakes are rare.
- Mount the X5 on the bike tail mount, tripod, or vehicle. Sync the GPS Preview Remote for a full preview and remote control experience. If I only need compact audio, use the Mic Air clipped under a shirt or on a strap.
- Start recording from the remote and monitor the preview. Record GPS telemetry for overlays and speed data later.
Real-world examples
I used the remote and Mic Air for a Jeep exterior rig where I controlled the camera from inside the vehicle and the audio from the remote was surprisingly clean. On a bike ride I relied on the tail mount plus ND64 for motion blur and used the Mic Air when I wanted smaller, less conspicuous audio capture. For long hikes or multi-hour overland days I combined the Ultra Battery with endurance mode for the longest continuous runtime.
Final thoughts and quick recommendations
These insta360 x5 accessories aren’t flashy add-ons; they are practical upgrades that fix common shooting problems. If you shoot outdoors with the X5, consider the value of each accessory relative to how you work:
- Get the GPS Preview Remote if you mount the camera away from your body and want built-in mic plus GPS telemetry.
- Buy the ND filter set if you care about cinematic motion blur and shooting in sunlight.
- Pick up the Ultra Battery for longer outings and fast charge capability.
- Use the Mic Air for a compact Bluetooth option when you want quality audio without the remote.
Between control, better exposure control, longer runtime, and cleaner audio, these insta360 x5 accessories combine to make the X5 much more versatile in the field. They solved everyday problems I ran into and let me focus more on capturing the moment and less on micromanaging gear.